Raspberry Pi Zero HW – Overview
People who often use Raspberry Pi have been through quite many changes over the years. First, there was the Raspberry Pi 3 which was quite powerful, big and a little too costly for users’ liking. Then there came the Raspberry Pi Zero W which many took to for many reasons. For one, it was much smaller and less tasking on the pocket. It was also much more efficient than its predecessor. The only downside to it was that it had less power than Pi 3. That said, people embraced it with ease.
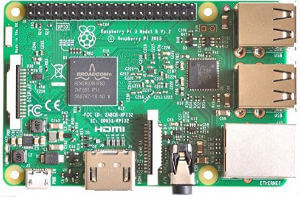
The Raspberry Pi Foundation did not stop there, and users were quite excited to hear of an update on this model: The Raspberry Pi Zero WH. The letters W and H stand for wireless and header respectively. Once word got around that robotics enthusiasts could get their hands on it for only fifteen dollars, the anticipation was evident in the months that followed.
The thing with the Raspberry Pi Zero is that it comes without GPIO ports such that you have to work on the soldering upon delivery. One of the changes in the HW is that there are GPIO ports; which means that you can do away with the welding. This change has not been without its fair share of effects. The HW is much thicker than the W, and this makes it less flexible than the latter. As such, it is best suited for use by students and beginners in the field who are not all that conversant with soldering.
This advancement will indeed come in handy for anyone who wants to skip the welding part to avoid the risks involved as well as for anyone looking to save time. An instance would be where you need ten Pi Zero W; a situation which will call for GPIO. There are also times that one cannot find the Pi W and, in this case, the HW is the best alternative.
OpenELEC R11170
Here’s the latest build for OpenELEC.
The GZ has the relevant files so you don’t need to re-create the SD image (this is an upgrade in other words, have a look at the update guide for more info)
Strictly speaking you only need the Kernel and System files, if for some reason the updater does not pick up the update rename the files so they are KERNEL and SYSTEM (upercase)
Download the release (note : moved to dropbox to help with bandwidth)
—– EDIT
As some people have asked, and struggled to make the SD using the DD tools (probably due to slight differences in SD cards size/layout), here’s a quick rundown on how to make your own. (need a unix style system, not tried on MacOSX but should work with little mods)
Unpack the file somewhere
mkdir ~/OpenELEC
mv ./OpenELEC-r11170-29-05-2012.tar.gz ~/OpenELEC
cd ~/OpenELEC
tar -zxvf OpenELEC-r11170-29-05-2012.tar.gz
Then follow this procedure to make your own SD natively (oh and my system mounts the SD card as /dev/sdb, yours might not so change appropriately, oh and you may have to either sudo su or add sudo to the start of the lines so your SuperUser)
- parted -s /dev/sdb mklabel msdos (removes all partitions)
- parted -s /dev/sdb unit cyl mkpart primary fat32 — 0 16
- parted -s /dev/sdb set 1 boot on (creates the Fat32 boot partition)
- parted -s /dev/sdb unit cyl mkpart primary ext2 — 16 -2 (creates an extended partition with the remaining space)
- mkfs.vfat -n System /dev/sdb1
- mkfs.ext4 -L Storage /dev/sdb2 (puts the filesystems on the partitions)
partprobe (Get the local kernel to refresh the partinfo) - cp start.elf /media/System/
cp bootcode.bin /media/System/
cp loader.bin /media/System/
cp SYSTEM /media/System/
cp kernel.img /media/System/ (Assuming your SD has mounted as /Media/????, if not obviously replace the names) - echo “dwc_otg.lpm_enable=0 root=/dev/ram0 rdinit=/init boot=/dev/mmcblk0p1 disk=/dev/mmcblk0p2 ssh debugging” > /media/System/cmdline.txt (this creates the boot parameter file, and has the debugging mode enabled CTRL-ALT-F3/CTRL-ALT-F1)
That should get you up and running, then you can use the standard OpenELEC update method afterwards.
And now back to NasBerry………
OpenELEC v2beta4
A new beta for OpenELEC has been released
They’ll get a new build together in the morning for this, and put the needed files online after making sure it seems to work ok.
OpenELEC build
Whilst getting to grips with the RaspberryPI I’ve been having a play at building some operating systems and a system, which I made for casinoslotmachines.co, to check and compare a few casino operators with online slot machines.
A couple of people have asked me for this one, so here’s a DD image for it (can write it with Win32DiskImager)
Download OpenELEC-12-05-2012.img.zip – note : moved to DropBox for bandwidth reasons – (and write it in the same way you would any image (so in *nix use DD and in Windows use Win32DiskImager)
I’ve set it up so it (should) fit on a 1gb SD. But obviously use GParted or MiniTool (might) be able to extend the EXT4 second partition.
First boot will take a while (so be patient) after that it should work nicely. There is a bug with the IMDB plugin (ill look into it).
This version is using Eden (XBMC), but I’m looking at getting Frodo (XBMC) up and running.
Let me know if you need anything else.
SSH enabled
Username : root
Password : openelec
QEMU Virtual RaspBerryPi
Quick how to for getting ArchLinux up and running on RaspberryPi.
Download the image from here
Download QEMU (from ubuntu/linux use package manger to install qemu and qemu-system) or windows download http://lassauge.free.fr/qemu/
unpack the image, and make sure the windows qemu is unpacked into the same folder.
Windows command to launch
qemu-system-arm.exe -M versatilepb -cpu arm1136-r2 -hda archlinuxarm-01-03-2012.img -kernel zImage-devtmpfs -m 192 -append “root=/dev/sda2″ -vga std -net nic -net user –localtime
Linux / debian
qemu-system-arm.exe -M versatilepb -cpu arm1136-r2 -hda archlinuxarm-01-03-2012.img -kernel zImage-devtmpfs -m 192 -append “root=/dev/sda2″ -vga std -net nic -net user
once the QEMU image is up and running, login with root / root
first thing first,
- pacman –Syu
- pacman -S lxde xorg-xinit xf86-video-fbdev
- xinit /usr/bin/lxsession
That should get LXDE up and running.
Next install yaourt using pacman –S yaourt
now test it out with Chromium doing the following. yaourt chromium-dev and when asked install package 1. If you get any issues you might have to edit the build and add ARM to the cpu support list.
That should get you started, I’ll update as we go.
UPDATE – Worth noting, the disk image has not got a lot of space. I would go through how to expand it, but it’s not super easy, and probably a little out of this post’s league. So let me know if you need the info or I may post the image.
Oh one last update, Kernel 3.2 – zImage-3.2.9. Seems to work fine, however no promises, and there’s still some missing modules, I’ll look into that. After some testing I’d stick with 3.1.9 for the moment.
GitHub setup
They’ve set their GitHub up, so feel free to sign up.
There’s nothing in there at the moment (besides a README) but that’s where the project will live.
They are currently prototyping something, and when they are happy they will get it up onto github.
They are just experimenting with the best way to prototype, run on an x86 VM and port to ARM, or use QEMU to run ARM native? If you have any experience with either strategy then they would love to hear from you.
For now though, bare with us while they get upto speed, and if you have anything you can help with, then your more than welcome to email us
New Logo
You might have noticed that they have got ourselves a nice, shiny, great looking new Logo!
![]()
Huge thanks to Julien Dutertre for the design, I’m sure we all agree it’s excellent.
Orders
It seems that the two suppliers (RS and Farnell) have struggled with traffic this morning! Farnell is still struggling now, although if your patient, and have a decent F5 key then you can still pre-order yours with them, and there’s always RS on Friday if your lucky.
Either way, let us know if you’ve got one coming and what your looking forward to using it for…. besides a NAS.
Oh and they have something exciting to announce as well soon, a sister site that will extend the functionality of NasBerryPi using, you guessed it, another RaspberryPi.
The other great news announced is that the Version A product will get a RAM bump as well, so it too get’s 256mb of Ram up from the 128Mb that it was originally having.
 RaspberryPi have announced that two partners,
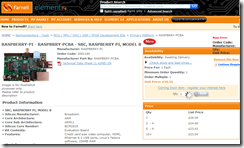
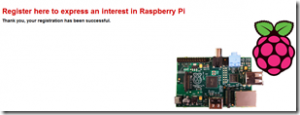
The time is set
06:00 tomorrow morning seems to be the time to get you name down for a RasberryPi.
I would recommend being up early, and being ready to press F5 a fair bit.
Oh before you go and ask questions on the post, instead rather pop to the FAQ and Wiki